For my son's Hobbit theme birthday, An Unexpected Birthday Adventure, part of the adventure naturally included the slaying of the Dragon Smaug. After getting the price for a custom dragon pinañta ($65!), I decided to make my own dragon with the help of on line tutorials.
This is what I did.
I started with three long balloons taped together to form the body cavity. I had to go to a party store to find the right shape balloon, because this isn't a commonly carried shape these days. To the three-balloon body I taped paper-towel tubes as the neck and the tail. Once the shape was taped, I gave it a good coating of Vaseline to help the balloons release once the paper mache is applied. I also realized that in a digital age, we no longer had newspapers laying around waiting to be cut into strips! I had to improvise with plain newsprint paper from one of my son's doodle pads.
 |
I started with the paper mache by applying 2" wide strips of paper dipped and wiped smooth with the paste. The recipe I used was 1/2 cup flour to 1 cup water, then cooked on the stove until it thickens. I sometimes had to add a bit of water (or ice cubes) to thin out the paste. I did several layers up and around, crossways, front to back, with each layer going in an opposite direction that the last.

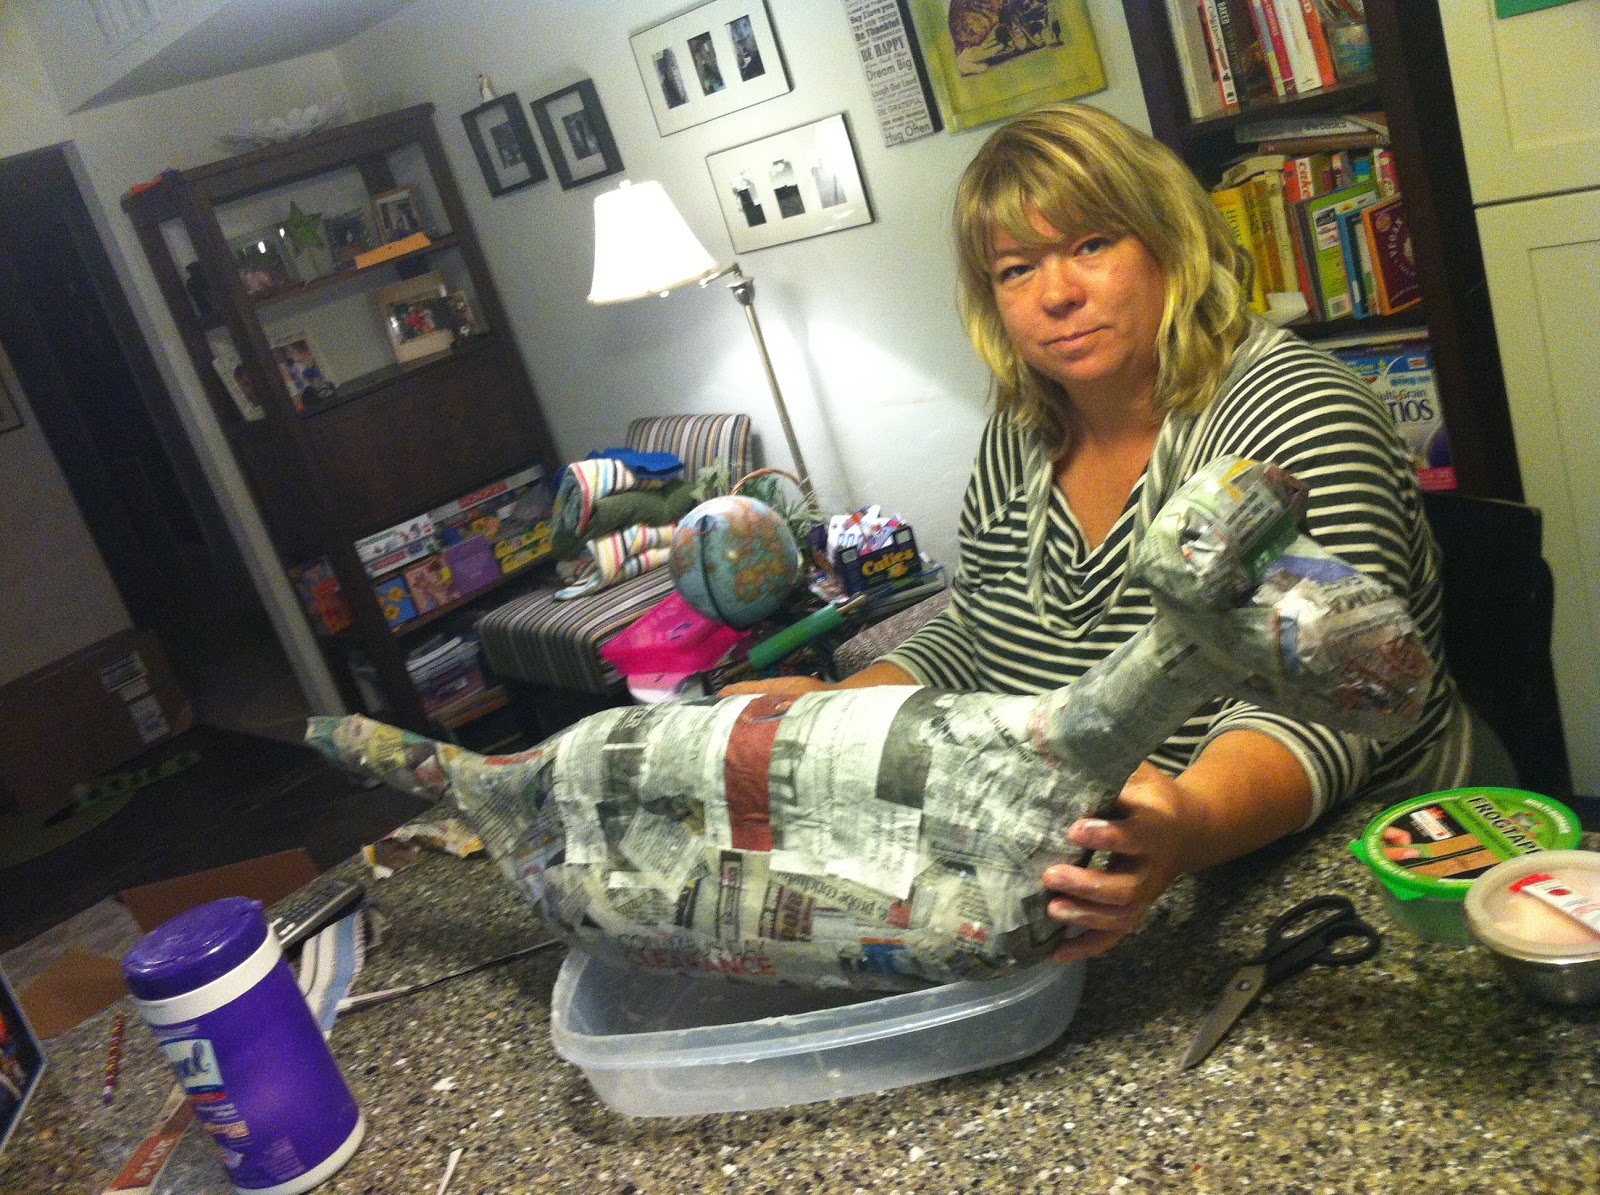
It is super messy, so I put the body in a large tub and kept a wet rag handy to clean off my hands.

The building of the shape went slowly and I made sure not to oversaturate the paper. When it felt as though I had to much paste on the body, I added dry strips to soak it up.

The shaping of the neck just required just letting my inner sculptor come out. It was by no means perfect, but it was a base to start with. And always remember that it will be covered with fluffy crepe paper, and that hides many mistakes.
I let the body dry under the stove light and kept the fan on. I made this in January during an uncharacteristic cold snap, so drying was an issue. If weather permits, I would surely put this outside in the sun and it would work much, much better!

Day 2: I snagged some newspapers to be recycled from the pre-school and got to work. (Excuse the tired face: I broke out the messy process only once the boys were in bed. It was late-night paper macheing only!)
For the shape of the head (sorry I didn't get a photo of the structure) I used four toilet paper rolls. Two side by side with one underneath to make an upside down pyramid shape. The fourth is placed across the top of the head for the cranial bump. I then taped that onto the neck stump.
Several more layers of newsprint and he was starting to take shape. The next morning I cut out a door on his back for candy to be inserted and I removed the balloons. I needed to use a hair dryer on the inside because of the slow drying. (At this point, my son said it looked like a 'grounded, French bird'. So it does...)

Day 3: And somehow my photos are missing (because maybe I forgot to take some?) of the next step of adding wiring. I made a wire harness for the body going over the back and straight down under the rump and chest, spreading the wire out to basket those areas. I then put a wire horizontally right under the tail and across the chest. The wire over the back was bumped up a bit to create a handle.
After the wiring was on, I added another layer of newspaper. I didn't know it then, but this was one super strong pinanta. I could have been a bit less heavy with the layers, because this proved very difficult for 6 & 7 year old boys to bust open.
Day 4: now it was time to decorate him! I used the crepe paper streamers for the majority of the body. I took a stack of streamers cut in 6" sections and then cut tabs halfway on the edge. I used white school glue on the edge and started in the rear, glueing each layer on to provide coverage and show the tabs. Because Smaug is described as red with a yellow belly, it was easy to portion off the body and get the colors in the right places. I added some orange strips for depth and some variation.

The wings were made from wire clothes hangars opened up to a wide V and then hooked into the wire frame. We duck taped the hangars together and onto the body. (When you are going to cover it all up, you can make it strong and not worry about appearances.). I used two layers of red and yellow tissue paper folded over then stapled around the wire. I had to fidget and work this a bit to get it right, but I just tried to get a clean fold. A helper at this point is very good to have. Once the paper was on and secure, I cut strips into the paper about 2/3 of the way and gave them a good scrunch to separate the paper. Another layer or two of fringe-cut crepe paper over the edge finished off the wings and hid the staples.

Another piece of wire hanger went into the tail tube and then was covered with a tube of tissue paper which was cut into strips. I used orange to add some color variation.

Once it is covered with the crepe paper, a gentle fluffing and scrunching gives the paper separate and depth. The eyes were hand drawn and applied with glue. Some fire coming out of the mouth would have been cool, as well as some tucked up bird-feet. But all in all, I was really pleased with how he turned out.

... and so were the kids!

What a wonderful job!! I wish I could do something like this for my son's upcoming Knights and Dragons party, but it is just not in me. I don't have the vision required - definitely no "inner sculptor" here. ;-)
ReplyDelete